Frontend Perspective — Building Serverless Automated Deployment with GCP
by Hsuan Huang
In this project, I implemented serverless automated deployment using Google Cloud Platform
A while ago we had to deploy a backend project for work. Our stack is mostly on GCP and we didn’t yet have an SRE or DevOps engineer, so after talking with the backend team and the PM, reading the official docs, and sizing up the timeline, I rolled up my sleeves and tackled it myself.
Summary of this post: Documenting my first experience deploying on GCP from a frontend perspective — the motivation, process, and some reflections. A lot of the content may seem a bit rough, since this is definitely deep water 😂. I’ll mostly focus on the deployment process itself, particularly around Cloud Run, rather than diving into other GCP services, since I’m not familiar with them yet and currently have no direct need.
Target audience: Frontend engineers who need to deploy projects.
Prerequisites: A tiny bit of understanding of CI/CD, GCP, and Docker — just enough to follow along. This post probably won’t be of much help to the pros out there 🫠.
Motivation
As the backend project grew, manual deployment became unsustainable. It was error-prone, tedious, and increasingly inefficient — especially with more people involved and the need for multiple development environments. At that point, it became necessary to automate everything through scripts. This not only saves time and reduces errors, but also provides logs for easier debugging when things go wrong.
Personal takeaways and understanding
Cloud Run is a container-based service where you just need to write a Dockerfile for your image — no need to worry about allocating specific CPU or memory sizes. Unlike Compute Engine, which spins up a full VM (Virtual Machine), Cloud Run abstracts that away for you.
So naturally, for an internal backend project used only by team members — where traffic won’t spike suddenly or crash the site — there’s no need to worry about load balancing or horizontal scaling. That made Cloud Run the obvious choice.
Alright, enough rambling — let’s dive into the process. But first, here’s a little cute sushi for you 🍣
Process
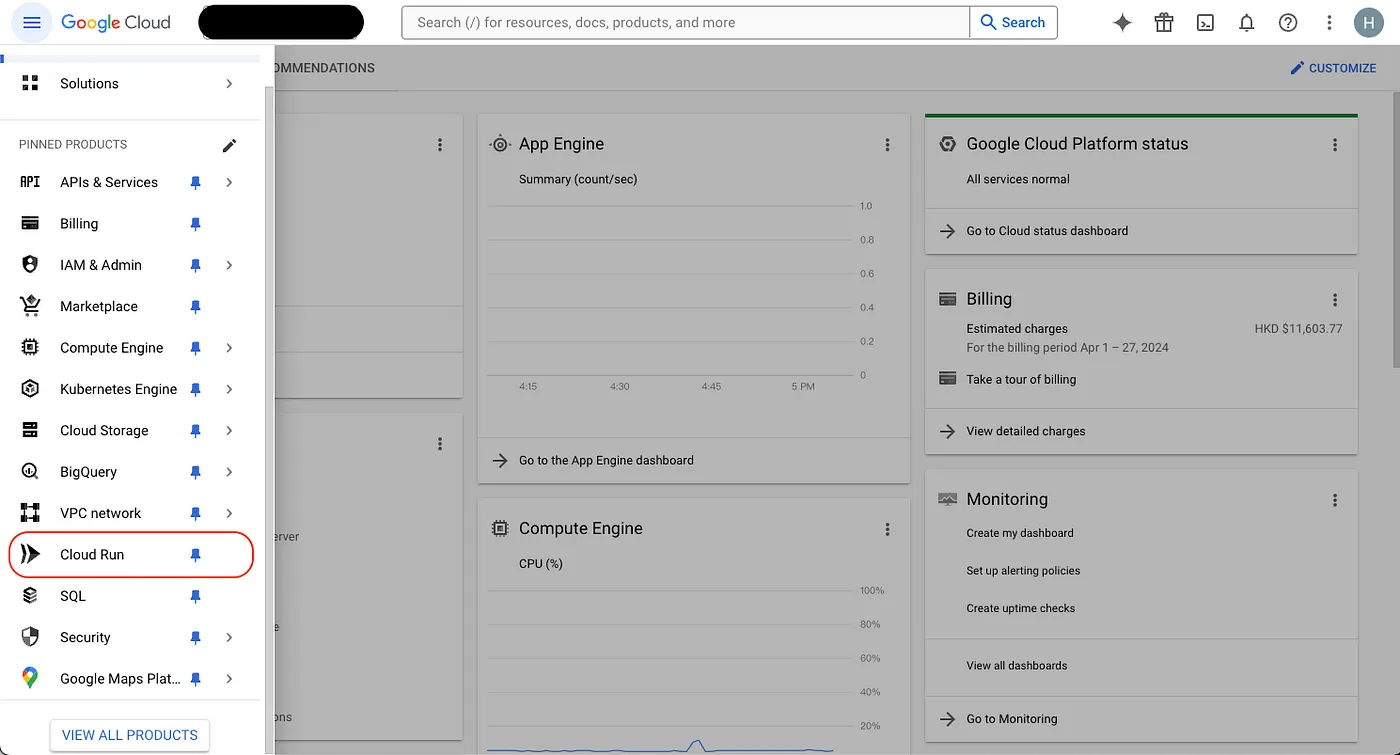
- First, go to GCP and select the Cloud Run service from the left sidebar
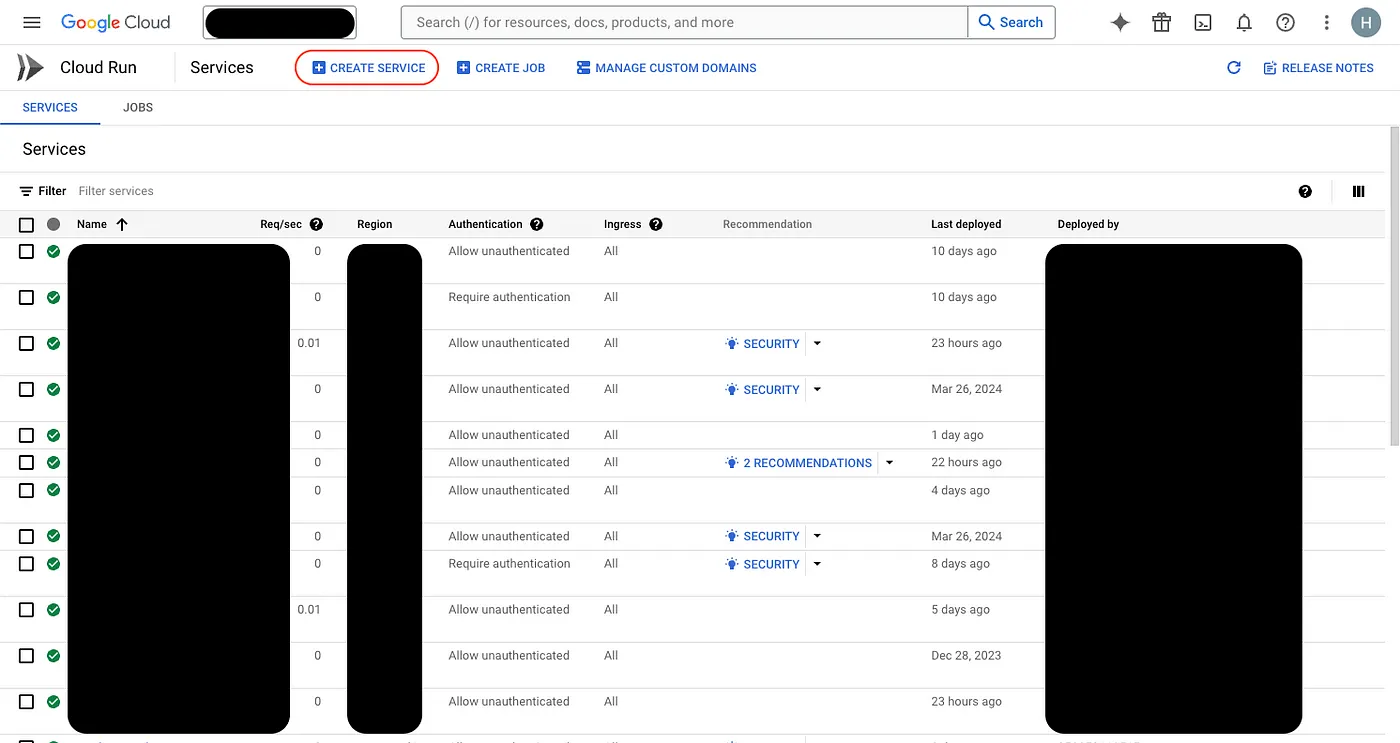
Click on CREATE SERVICE
Next, set up the connection with GitHub
- Then a popup will appear on the right — select the repo you want to deploy
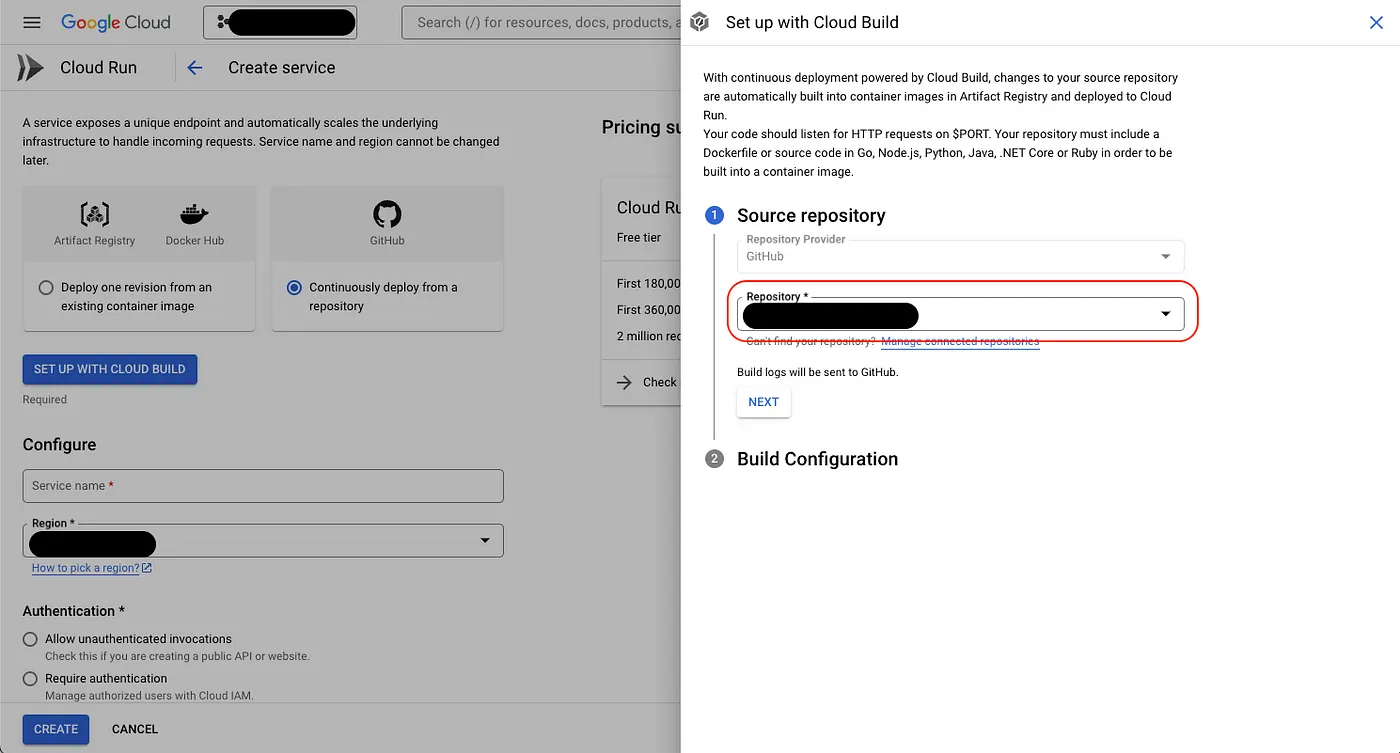
- Choose the branch you want. For
Build Type, selectDockerfile— mainly because some environment variables now or in the future you don’t want to handle through GCP. Simply put, GCP will only look at your Dockerfile and won’t build by scanning your entire codebase.
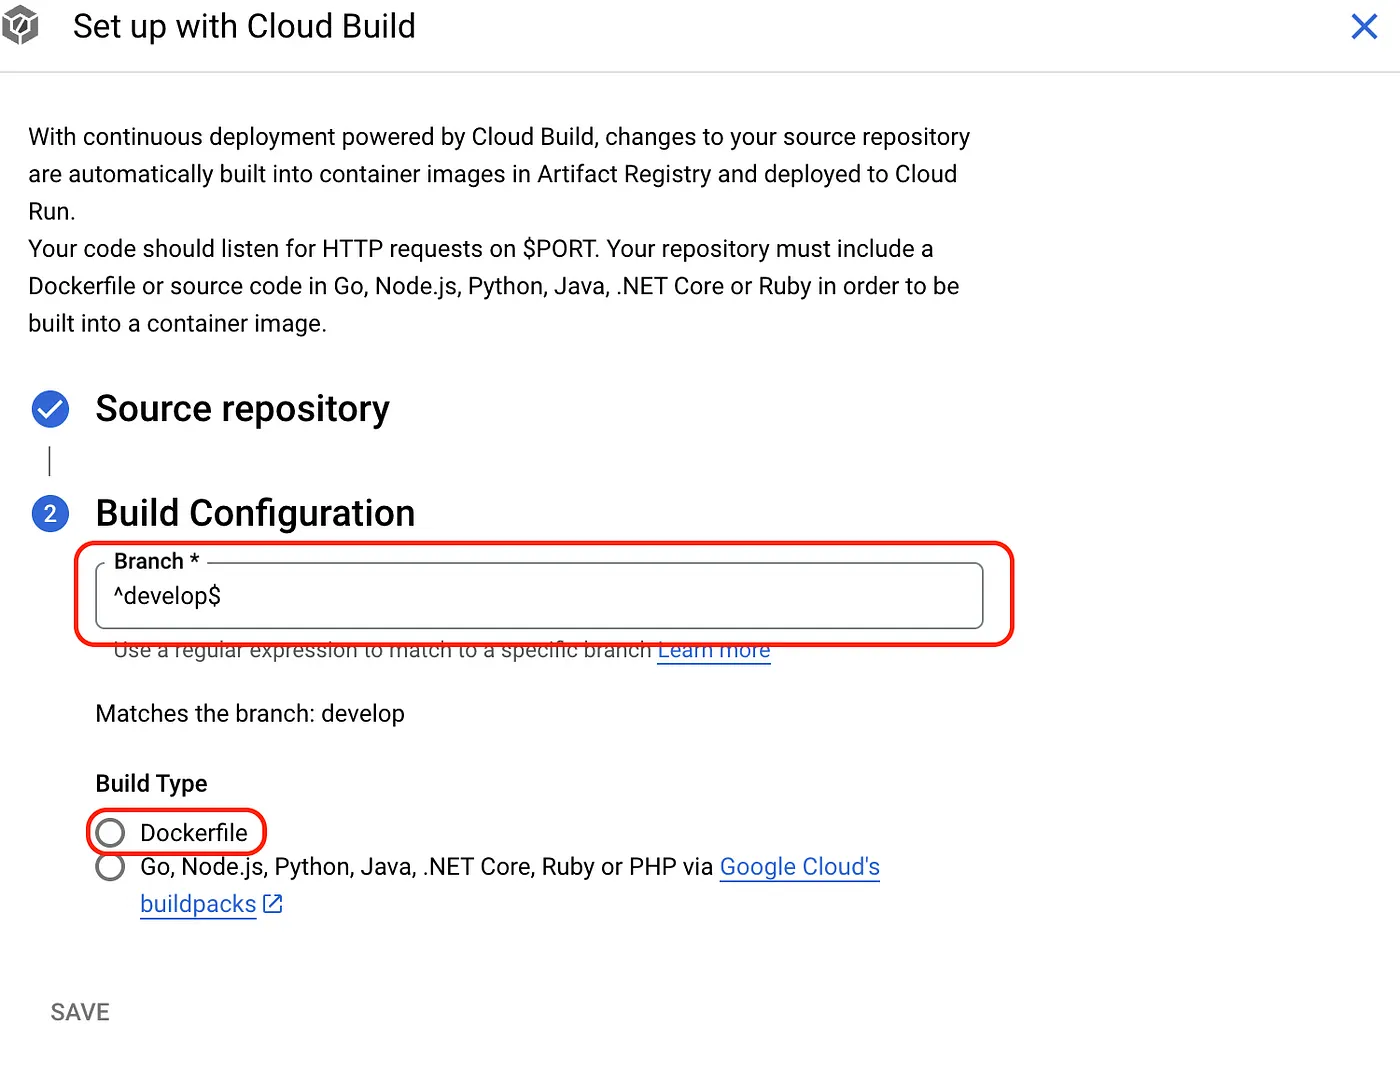
- After clicking SAVE, continue configuring
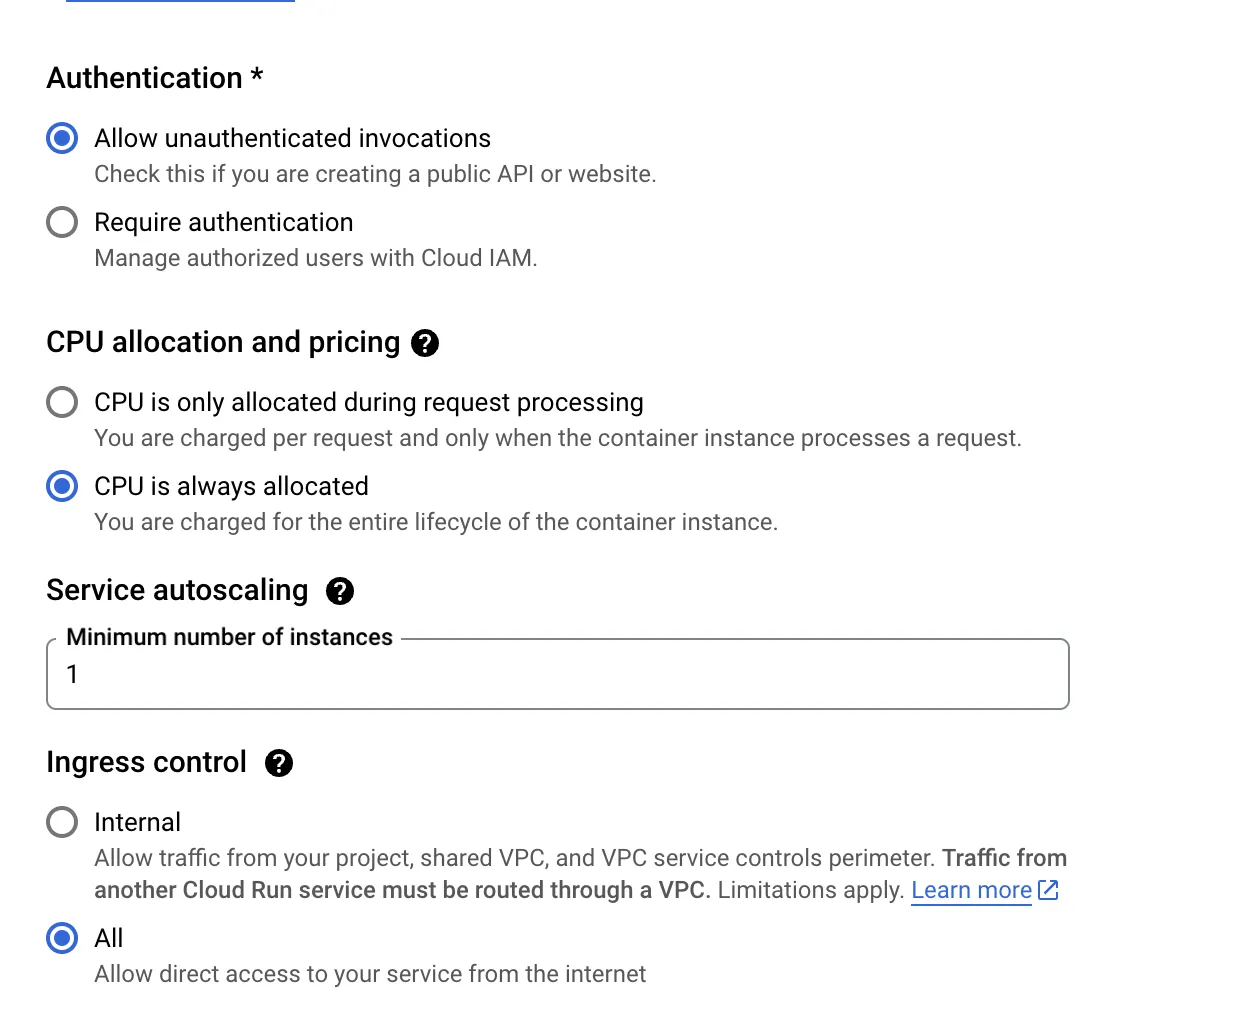
Region,Authetication,CPU alllocation,Service autroscaling, andIngress control
I didn’t capture a screenshot of the Regionpart, but just pick the closest one — you know, I chose Hong Kong or Taiwan. The other settings are shown in the image.
Worth noting is the CPU allocation: the first option only starts up when there’s a request, which means longer cold start times. The second option always allocates at least one CPU instance (Minimum number of instances), so users don’t have to wait as long to access the site.
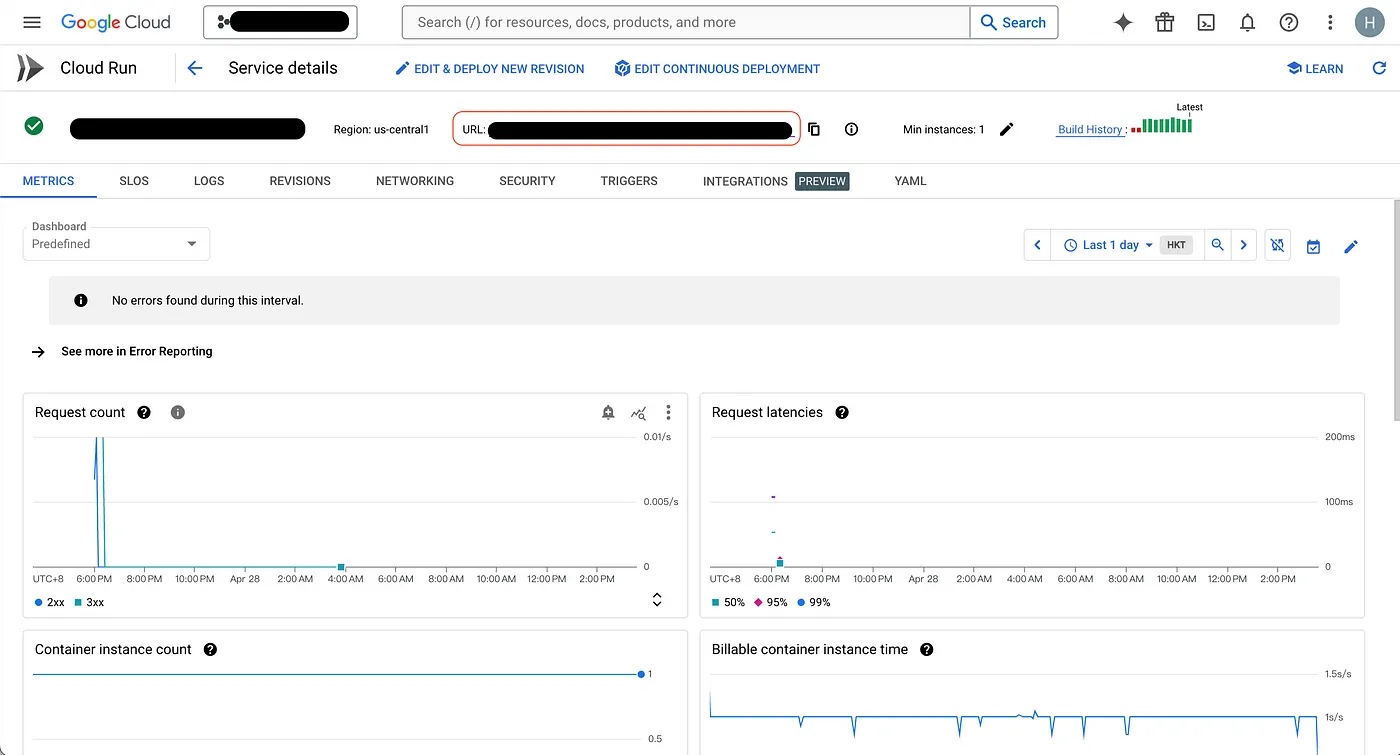
- Once all these are done, click
CREATE. After a moment, your service will appear in the list below. Click it to see the URL at the top — that’s your deployed URL. However, at this point, you’ll likely see a red cross indicating deployment failure, because we haven’t written theDockerfileyet.
- Remember we chose Dockerfile earlier? Now it’s time to go back and write the Dockerfile in your project files — just name it simply
Dockerfile
The main commands are pretty straightforward: basically, first install the base image and packages → set the entry point → choose which files Docker should copy over → specify the commands to run.
You can ignore SHORT_SHAfor now; it’s mainly a variable I added because I want to display the version number on the deployed site.
# 從名為 node:18-alpine 的 Docker 映像檔開始
FROM node:18-alpine
# 使用 apk 命令安裝 libc6-compat 套件,--no-cache 選項表示不使用緩存
RUN apk add --no-cache libc6-compat
# 將工作目錄設置為 /app
WORKDIR /app
# 複製 package.json 文件和 yarn.lock 文件(如果存在)到當前工作目錄,"." 表示當前目錄
COPY package.json yarn.lock* ./
# 執行一個複合命令:
# 如果存在 yarn.lock 文件,則運行 yarn --frozen-lockfile 命令以安裝依賴,--frozen-lockfile 選項表示在存在鎖定文件時使用凍結模式
# 否則輸出 "Lockfile not found." 錯誤信息並退出,exit 1 表示退出並返回錯誤狀態碼 1
# --frozen-lockfile 會強制 yarn 使用鎖定文件中指定的依賴版本,而不會更新依賴的版本。這樣可以確保在不同環境中安裝相同的依賴版本
RUN \
  if [ -f yarn.lock ]; then yarn --frozen-lockfile; \
  else echo "Lockfile not found." && exit 1; \
  fi
# 複製當前目錄下的所有文件和文件夾,以及 .env 文件到當前工作目錄
COPY . .
COPY .env .
# 定義一個叫做 SHORT_SHA 的 ARG 變數,然後將其設置為環境變數 SHORT_SHA,這是一種從 Dockerfile 傳遞參數給容器內部的方式
ARG SHORT_SHA
ENV SHORT_SHA=${SHORT_SHA}
# 使用 yarn 命令執行 build 腳本,這個命令會根據 package.json 中的配置進行構建。SHORT_SHA=${SHORT_SHA} 用於將環境變數 SHORT_SHA 傳遞給 build 腳本使用
RUN SHORT_SHA=${SHORT_SHA} yarn build
# 將容器內的端口 8080 暴露給外部,使其可以被其他容器或外部訪問
EXPOSE 8080
# 定義容器啟動後要運行的默認命令,這裡指定運行 yarn preview 命令
CMD ["yarn", "preview"]
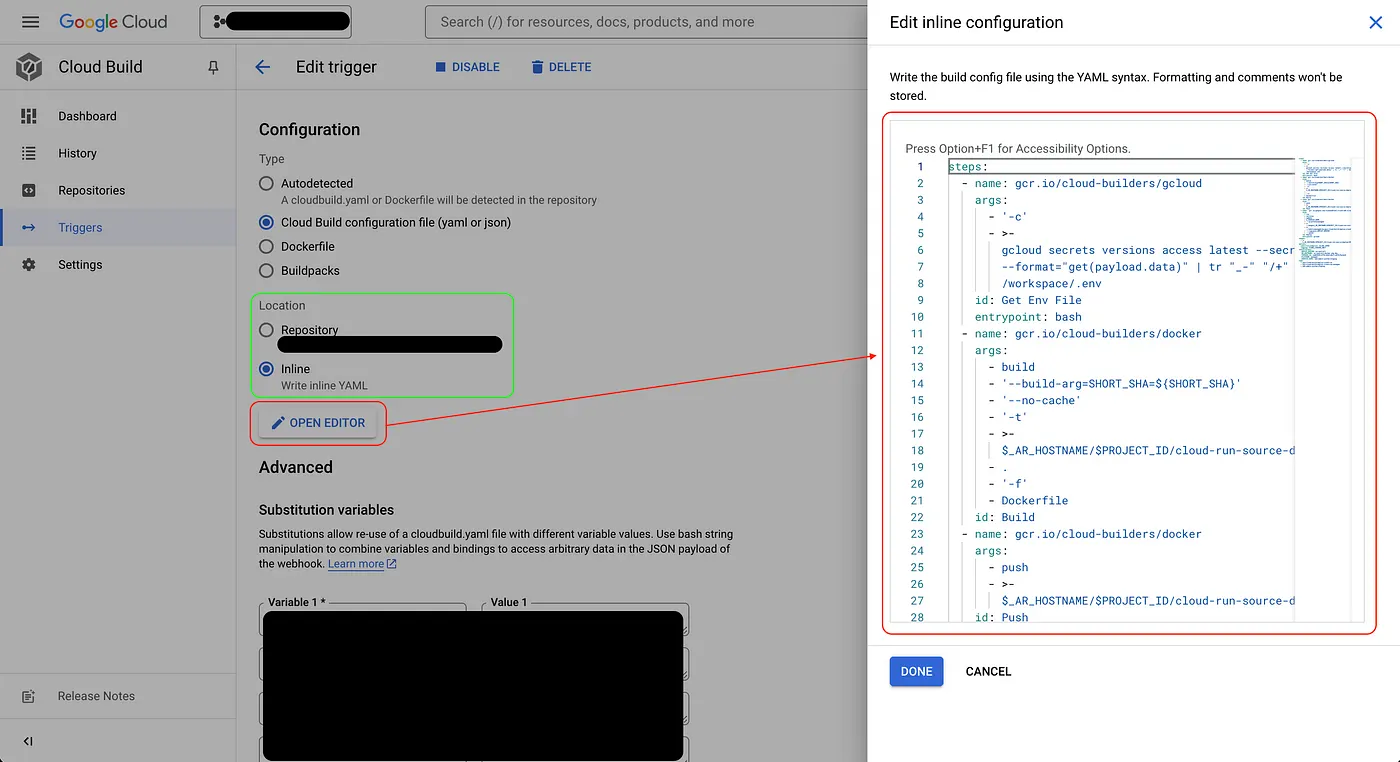
Next, we need to write a very important script called cloudbuild.yaml. Here, we write it directly on GCP. It offers options to select whether to get the script from the repo or inline; I chose inline because later I’ll need to fetch my API key from Secret Manager. I want different projects to retrieve different Secret Manager files, but we’ll discuss the Secret Managerpart later.
- Click
EDIT CONTINUOUS DEPLOYMENTto get ready toEDIT TRIGGER
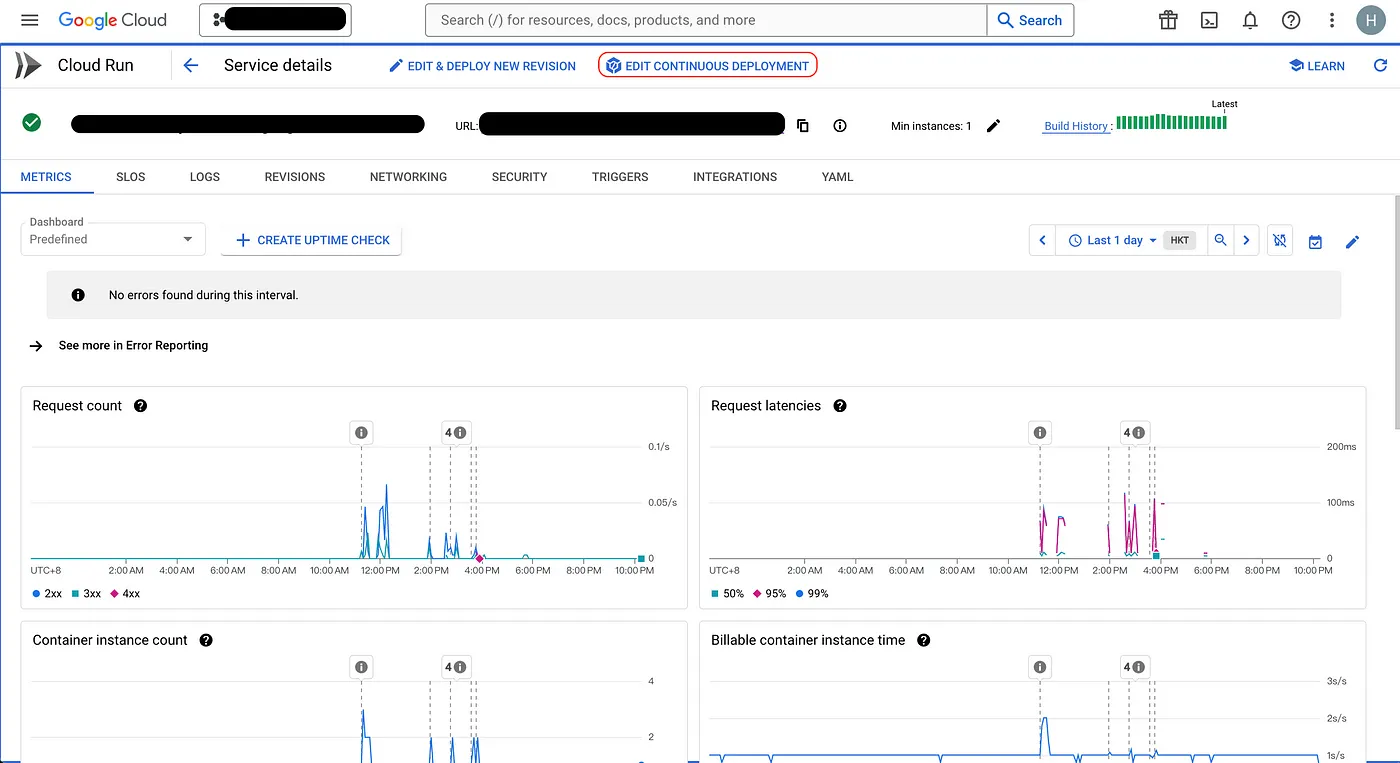
- Scroll down to
Configuration, click OPEN EDITOR, and the YAML file will open on the right side where you can see the default template.
After clicking Save, the trigger will automatically activate. Later, if you update the Secret Manager or notice it didn’t trigger, you can come back here and manually click RUNto trigger it.

Here is the actual content of my cloudbuild.yaml. The parts labeled xxxx-xxxxand ${your xxx}contain sensitive information and are not disclosed.
steps:
  # 步驟 1: 取得環境變數文件
  - name: gcr.io/cloud-builders/gcloud
    args:
      - '-c'
      - >-
        gcloud secrets versions access latest --secret=xxxxxxxxx-xxxxxxxxx
        --format="get(payload.data)" | tr "_-" "/+" | base64 -d >
        /workspace/.env
    id: Get Env File
    entrypoint: bash
    # 這個步驟使用 gcloud 工具從 Google Cloud Secrets Manager 中取得最新版本的環境變數文件,
    # 並將其解碼後存放在 /workspace/.env 文件中。
  # 步驟 2: 建構 Docker 映像檔
  - name: gcr.io/cloud-builders/docker
    args:
      - build
      - '--build-arg=SHORT_SHA=${SHORT_SHA}'
      - '--no-cache'
      - '-t'
      - >-
        $_AR_HOSTNAME/$PROJECT_ID/cloud-run-source-deploy/$REPO_NAME/$_SERVICE_NAME:$COMMIT_SHA
      - .
      - '-f'
      - Dockerfile
    id: Build
    # 這個步驟使用 Docker 工具建構映像檔。使用 --build-arg 傳遞 SHORT_SHA 參數,
    # 並指定不使用快取 (--no-cache)。最後將映像檔標記為指定的目標名稱。
  # 步驟 3: 推送 Docker 映像檔至 Artifact Registry
  - name: gcr.io/cloud-builders/docker
    args:
      - push
      - >-
        $_AR_HOSTNAME/$PROJECT_ID/cloud-run-source-deploy/$REPO_NAME/$_SERVICE_NAME:$COMMIT_SHA
    id: Push
    # 這個步驟使用 Docker 工具將建構好的映像檔推送到指定的 Artifact Registry。
  # 步驟 4: 部署到 Cloud Run
  - name: 'gcr.io/google.com/cloudsdktool/cloud-sdk:slim'
    args:
      - run
      - services
      - update
      - $_SERVICE_NAME
      - '--platform=managed'
      - >-
        --image=$_AR_HOSTNAME/$PROJECT_ID/cloud-run-source-deploy/$REPO_NAME/$_SERVICE_NAME:$COMMIT_SHA
      - >-
        --labels=managed-by=gcp-cloud-build-deploy-cloud-run,commit-sha=$COMMIT_SHA,gcb-build-id=$BUILD_ID,gcb-trigger-id=$_TRIGGER_ID
      - '--region=$_DEPLOY_REGION'
      - '--quiet'
    id: Deploy
    entrypoint: gcloud
    # 這個步驟使用 gcloud 工具部署更新至 Cloud Run。它指定了服務名稱、映像檔名稱、標籤、區域等。
# 定義部署的映像檔名稱
images:
  - >-
    $_AR_HOSTNAME/$PROJECT_ID/cloud-run-source-deploy/$REPO_NAME/$_SERVICE_NAME:$COMMIT_SHA
# 配置選項
options:
  substitutionOption: ALLOW_LOOSE
  logging: CLOUD_LOGGING_ONLY
# 變數替換
substitutions:
  _DEPLOY_REGION: ${your deplot region}
  _AR_HOSTNAME: ${your ar hostname}
  _TRIGGER_ID: ${your trigger id}
  _PLATFORM: managed
  _SERVICE_NAME: ${your service name}
# 標籤
tags:
  - gcp-cloud-build-deploy-cloud-run
  - gcp-cloud-build-deploy-cloud-run-managed
  - web-admin-system-staging
You can see in step 1 the --secret=xxxx flag, which means that during the build phase, sensitive information like keys is fetched from the Secret Manager(as mentioned earlier). Storing sensitive data in Secret Managerallows centralized management and updates, and you can control access permissions accordingly.
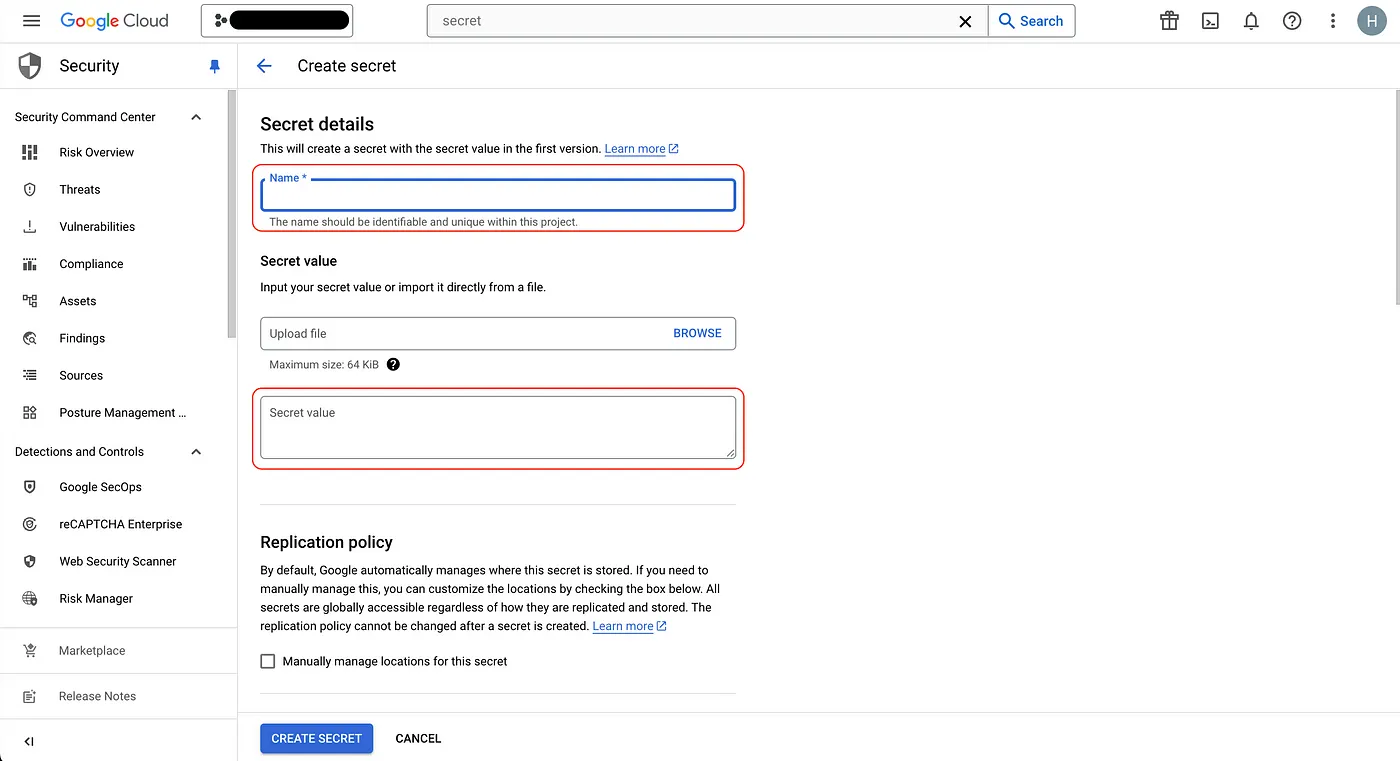
- Next, let’s set up the
Secret Manager. After searching forSecret Managerclick it, then clickCreate Secretat the top. You’ll see the screen below where you can enter a name. This name corresponds to thexxxxpart in the--secret=xxxxxflag mentioned earlier. - For the Secret Value, upload all the keys from your local
.envfile, then clickCREATE SECRET🫨
You can go back and manually run the trigger since updating the Secret Manager does not automatically trigger a build.
Basically, once you’ve done this much, the setup is basically complete. From now on, whenever a PR is merged successfully, it will trigger the build and automatically update.
There are probably many gaps in my knowledge, but this is a share and note-taking from the perspective of a frontend developer doing Cloud Run builds on GCP for the first time — mainly for future reference. Recently, I’ve heard quite a few DevOps talks at work about K8s, pods, VMs, containers, images, and all those terms, which was pretty overwhelming. But I’m gradually starting to understand and find it quite interesting.
Every time I see “CI/CD,” “GCP,” or “K8s” listed as plus points on job descriptions, I’ve always been curious. Recently, I’ve started to get a little understanding of them 🫠.
If you spot any mistakes or want to discuss anything, feel free to leave a comment. Although I might not always have the answers!
- reference 1:Dockerfile docs
- reference 2:GCP docs